[Image:132006_20253_0.png]Work with non-FirstClass documents more efficiently Minimum version: FirstClass 8.0 Audience: Administrators Experience: [Image:9203_22426_0.png] Features we use: [Image:9203_24337_3.png][ fcp://@fc.onlinehelp.com,%237600229../Client Help/L53 ]conferences [Image:9203_24337_3.png]Common Internet File System protocol (CIFS) [Image:9203_31709_1.png] Summary [Image:28102004_30352_0.png] Note This process is not supported on Mac OS X. Want an easier way to work with non-FirstClass documents in a FirstClass environment, and have them automatically saved on your FirstClass Desktop whether you're logged into the client or not? Updating external files (such as Microsoft Word documents, Excel spreadsheets, or html files) in FirstClass can be a cumbersome process: you have to open the uploaded document as read-only, save or download it to your hard drive, edit it in the appropriate program, then upload it to FirstClass again. This process can be frustrating, especially if multiple users download and make changes to the document. Simplify this process by using the FirstClass Common Internet File System (CIFS) protocol, which uses your FirstClass system as a file server. This allows you to streamline the editing process by eliminating the need to constantly upload and download documents to and from your hard drive through your FirstClass Desktop. Using CIFS, your users can update non-FirstClass documents either in a container on their FirstClass Desktop, or on their mounted hard drive. When a document in one location is updated, the other gets automatically updated as well. This provides flexibility to users who are not using the FirstClass client to work on documents in a FirstClass container without having to log in. These diagrams compare the old method of editing non-FirstClass documents with the new method using CIFS: [Image:11152005_31914_0.png] This way of working with multiple documents makes the editing process much more efficient, and ensures that only one person at a time can edit the document — if someone else opens the document while it is already being edited, it will open as read-only. When you use CIFS, you do not need to log in with a FirstClass client, but you must authenticate using FirstClass credentials (a user ID and password). [Image:28102004_30352_0.png] Note Since CIFS is an Internet protocol, you require Internet connectivity on both your local machine and the Internet Services (IS) machine. [Image:9203_31709_1.png] Example Michael Green is the VP of Sales and Marketing at Husky Planes. He has just assigned five of his employees an important project. In order to complete this project successfully, the team members have to access and update a number of non-FirstClass documents on a daily basis. Michael discusses this with the FirstClass administrator and they decide to use the CIFS protocol to help his team to work more efficiently. Step 1: Create the project conference Michael creates the Sales and service conference on his Desktop and gives the appropriate permissions to the team members. He then uploads the necessary non-FirstClass documents to the conference and subscribes the team members. This is what the Sales and service conference looks like: [Image:20022004_105009_0.png] Step 2: Enable the CIFS protocol Susan Bunting, the FirstClass administrator, enables the CIFS protocol. Susan needs to disable file sharing on the IS machine before enabling CIFS. To do this she follows the instructions in the Configuring and Activating CIFS document in the Internet Services conference of the FirstClass online help. Susan then follows these steps to activate the CIFS protocol on the IS machine: 1 From the admin Desktop, she opens the Basic Internet Setup form in the Internet Services folder. 2 She selects "Enable CIFS/SMB" on the File tab. [Image:11152004_44846_3.png] [Image:28102004_30352_0.png] Note Susan can also configure advanced options (such as standard timeouts, port numbers, and security options) on the CIFS tab on the Advanced Web & File form, found in the Internet Services folder. Step 3: Map the FirstClass Desktop to a local machine Each team member must map his or her FirstClass Desktop to their local machine. Susan sends each member of the team a set of [ fcp://@fc.onlinehelp.com,%237600229/101%20Uses%20for%20FirstClass/F2040#instructions ]user instructions to perform this task. Once team members map their FirstClass Desktops to their computers, they can access the non-FirstClass documents stored in FirstClass from their hard drive. Sara Parker, one of the team members, opens the Sales and service conference from the drive where she mapped her FirstClass Desktop. This is what she sees: [Image:foldcifs_win2.png] Sara edits the non-FirstClass documents stored in the Sales and service conference directly from her hard drive. When she edits these documents, her changes automatically show up in the conference. Sara can also edit documents directly from the conference in FirstClass. Other advantages provided by the CIFS protocol: • Team members do not have to log into FirstClass to update documents. • A document can only be edited by one team member at a time. • Documents are protected and backed up because they reside on the FirstClass server. [Marker][Image:9203_31709_1.png] User instructions to map the FirstClass Desktop to a local machine Follow these steps to map your FirstClass Desktop to your local machine: 1 Open My Computer or Windows Explorer. 2 Choose Tools > Map Network Drive. You will see a window like this: [Image:11172004_114959_0.png] 3 At Drive, choose the drive onto which you want to map your FirstClass Desktop. 4 At Folder, enter the IP address of the destination machine pointing to the FirstClass Desktop. For example: [Image:mapcifs_win.png] [Image:28102004_30352_0.png] Note Mount only a portion of an account by specifying a more refined path. For example, "\\111.222.111.222\Desktop\Conferences\PublicFiles", would mount the Public Files container and its subcontainers. Not all CIFS clients support this option. 5 When prompted, enter your FirstClass user ID and password. For example: [Image:11152005_32347_1.png] Once you have successfully logged in, all of your FirstClass Desktop objects will be listed on your hard disk in the drive you specified. For example: [Image:deskcifs_win.png]
   
F1016
 
 
Home  •  Help  •  Practical Uses for FirstClass  •  Developing Projects - Education  •  Project Stages  •  F1016
72203_112759_0.pngManaging tasks
Stages
 Traditional task management
Traditionally, students would manage tasks by dividing the required tasks amongst themselves during meetings. Then they would track their own tasks and report back to other members at later meetings.
FirstClass helps you and your students manage your tasks from one location. You can use your personal calendar to manage your own tasks, or use a group calendar to centralize the task management.  
9203_31808_2.png FirstClass is a task manager
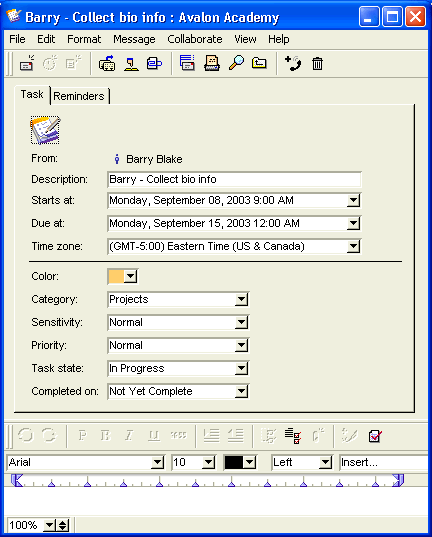
A FirstClass calendar is an excellent way to manage the tasks of a project. You can list the tasks required for a project and assign them to the respective team members. All of the information is kept in one location and can be accessed at any time. For each task, you can track the details, such as the date the task was started, when it is due, the priority level, the state of the task, and when it was completed. You can also schedule reminders for tasks and attach pertinent documentation.
This shows the details you can manage for each task.  
81203_110705_0.png
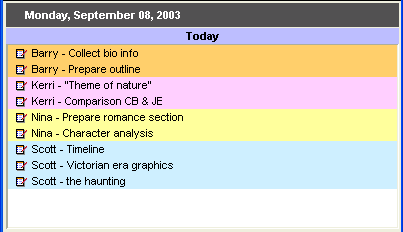
Like calendar events, you can use color to differentiate tasks, or assign a color to each person to differentiate between the tasks of team members.
31504_23505_0.png
Each team member has access to the same calendar. There's no need to make sure everyone is on the same track, because it is all laid out for each member to access at their own convenience. Furthermore, each member can
customize their own view to provide information to them in the way that works best for them.
9203_31808_2.png The next step
Once each student knows what they are responsible for, they can start collecting their information.