 
There are three main steps to install the FirstClass conduits on your Palm device:
1 Run the FirstClass conduits installer and follow the instructions.
You can download the FirstClass conduits installer for Windows, Mac OS, and Mac OS X platforms at www.firstclass.com/ClientDownloads/PalmSync, and follow the instructions provided for your platform. Conduits are placed in these locations:
• Windows: /Program files/Palm directory on your hard drive
• Mac OS: System Folder:Application Support:Palm HotSync:Conduits
• Mac OS X: Library:ApplicationSupport:Palm HotSync:Conduits.
2 Configure the FCSetup.
3 Perform an initial sync with FirstClass.
Requirements You must have the following specifications on your computer to install the FirstClass conduits:
Windows
• a FirstClass account on a FirstClass 7.0 server or higher server
• Palm Desktop 4.1 or higher
• Windows 98 or higher.
Mac OS
• a FirstClass account on a FirstClass 7.0 or higher server
• Palm Desktop 4.1 or higher
• Mac OS 9.1.
Mac OS X
• a FirstClass account on a FirstClass 7.0 or higher server
• Palm Desktop 4.1 or higher
• Mac OS X.
Installing the FirstClass conduits on Windows, Mac OS, and Mac OS X To install the FirstClass conduits:
1 Run the FirstClass Palm conduits installer and follow the instructions.
 Note Note This also installs the HotSync Manager.
2 Place your device in the cradle.
3 Press the sync button located on the cradle or on the Palm device.
4 Select your user name in the HotSync dialog box that appears on your Windows desktop.
If you're the only user, no dialog box appears.
After the initial sync, the FCSetup icon will appear on your Palm screen: On your Palm device:
5 Tap the FCSetup icon to open the Setup form:
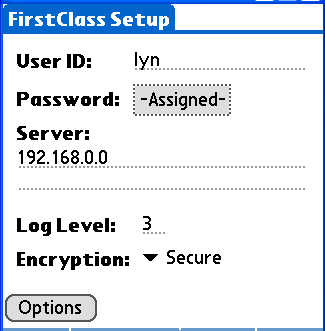 6 Enter the requested information: • UserID (FirstClass account)
• Password (FirstClass account)
For a new install, the default is "Unassigned", where you have the option to enter a password. For security reasons, we recommend you assign a password.
For an update install, the default is "Assigned", where Palm uses your old password. You have the option to change your password.
• Server (FirstClass domain name)
If you don't know your domain name, ask your FirstClass administrator.
• Log level
This can be set from 0 to 9. The logging information will be stored in the HotSync.log file on the Palm desktop.
NoteWe recommend you set the logging level to 0 unless you experience problems.
7 Choose Encryption level.
• Fast
Encrypts data at a basic level. This is most frequently used on networks when you want a fast connection and aren't particularly concerned about security.
• Secure
Encrypts data in a more secure manner than Fast. It is equivalent to the security used, for example, when you do banking on the Internet.
• Off.
Does not encrypt data. Choose this if you are using a modem that supports V.42bis or MNP 5 compression (because encrypted data can't be compressed).
8 Enter the requested information on the Options page.
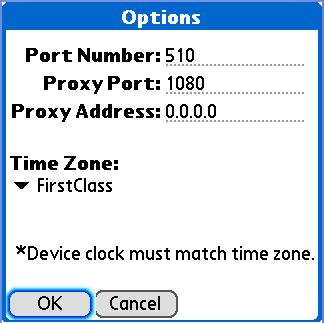 • Port number
The TCP/IP or UDP/IP port on the server. If you change the default, you are changing it for every settings file that uses the TCP/IP or UDP/IP connection.
• Proxy port
The port used to connect to the proxy server, if you connect through a proxy server. The default value of 1080 is the normal proxy server port.
• Proxy address
The proxy server's IP address, if you connect through a proxy server. If you do not use a proxy server, leave this at 0.0.0.0.
• Time Zone
.
Setting your time zonesYou have two different options to set time zones on your handheld device:
• FirstClass
This setting uses the same time zone as set in your FirstClass client personal preferences.
• FirstClass Setup on Palm
This setting uses your FirstClass client settings but does not change your FirstClass time zone preferences.
NoteFirstClass automatically adjusts for standard and daylight savings times. For more information on using FirstClass time zones, see Setting FirstClass preferences, in our online help.
You can set
a time zone different from the FirstClass server through the FirstClass Setup. We recommend that you keep the time zone on your handheld device the same as the FirstClass time zone.
To set your time zone: 1 Double click the FCSetup icon on your device desktop:
2 Click Options:
 4 Choose your time zone from the pulldown menu (FirstClass is the default).
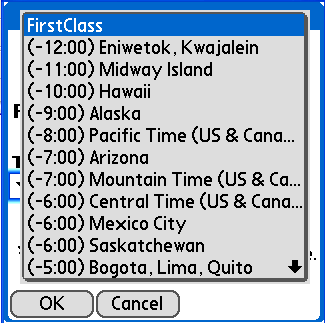 5 Click OK.
| ||